2009 Honda Pilot Radio InstallBy Rich Carlson, N9JIG |
|---|
For my birthday this year my wife bought me a new car to replace my old Honda Odyssey and we looked at several alternatives. I was leaning towards an SUV, for the last 20 years I have alternated between vans and SUV's about every 3 years. For the past 5 or 6 years we have bought Hondas, with 5 in the family now since 2003, 8 if you include motorcycles. I looked at several other makes and models, including the Expedition, Tahoe, Sequoia and others. I finally decided on sticking with Honda and we bought a new Honda Pilot. 2011 Update: I replaced the 996T with a BCD996XT and both BCT15's with BCT15X's. I also added a second BCD996XT. Scroll down for more details Scroll to the bottom half for the now completed install! |
 |
 |
|---|
| One of the reasons I bought the Pilot was the way my radios would fit in. There were several places on the Pilot that other vehicles just didn't have that made it ideal for my radios. |
|---|
Over the last few years I have stabilized the radio installation in my vehicle to 3 scanners, 2 Motorola 2-ways and a ham dual bander. This allows me to use the radios for a variety of purposes, such as monitoring and talking on my various VHF and UHF work channels, working on ham channels, using GMRS repeaters, and a wide variety of monitoring.
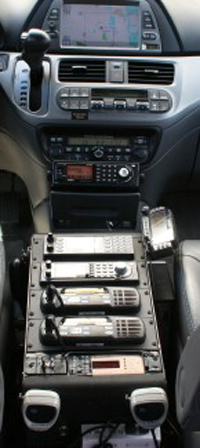
Here is an installation from my old van. After this picture was taken I moved a CDM1250 to just forward of the GPS receiver moved the Kenwood head to the forward drink tray and the BC15 back to the stack. I also built a new faceplate for the tone decoder. |
 |
|---|
| Scanners: |
|---|
One scanner is dedicated to several Midwestern statewide
digital trunking systems (Illinois' StarCom21, Indiana's Safe-T
and Michigan’s MPSCS systems). The BCD996XT is ideal for this purpose
as it supports the RH-96 and has a GPS connection which allows
me to have the radio set to turn on and off the various systems
and towers automatically as I move around the area. I also have
the Wisconsin State Patrol set up in a similar fashion with their
VHF system. Since I travel all over the Midwest often this is invaluable
for me. A second scanner is dedicated to CloseCall operation almost all
the time. This allows me to search out new nearby freqs anywhere
I go. I keep this set up with a scan bank that includes strategically
selected emergency channels such as the statewide fire and police
Mutual Aid and tactical channels, all I have to do is press the
Scan Button to go to this bank. The Uniden BCT15X is the ideal radio
for my purposes here, it is inexpensive, the CloseCall feature
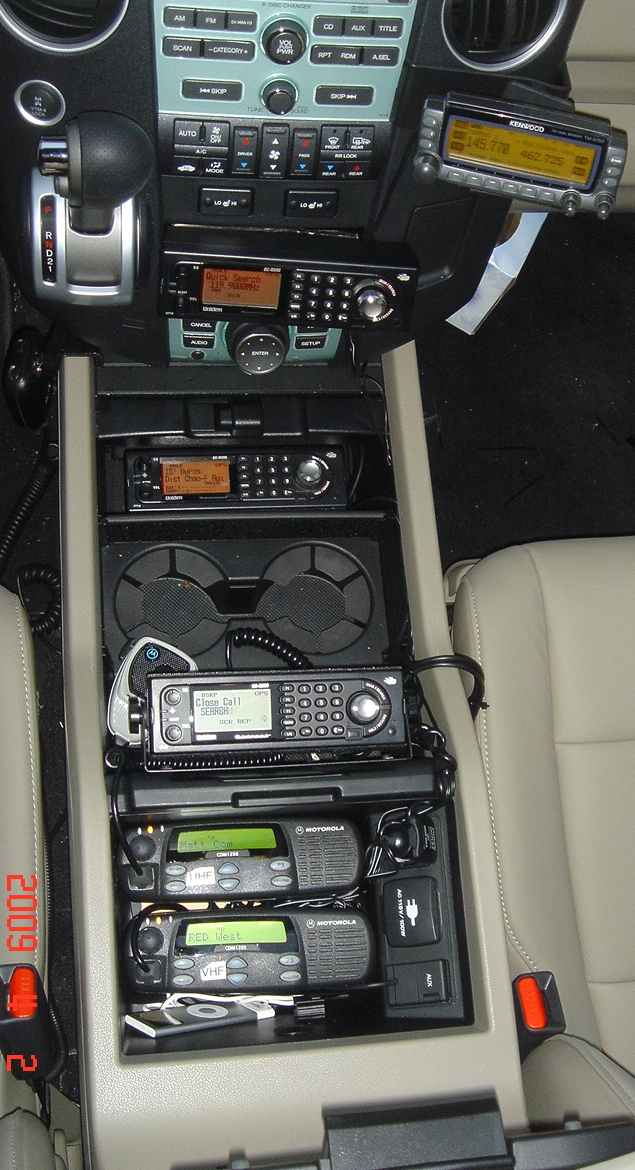
works great and it supports the RH-96. The third scanner is used for basic generalized scanning needs, I have banks for local fire and police operations, railroads, aviation and other uses. I had previously used a BC796 in the past but will now use a BCT15X for this since it supports the RH-96 and has more memory capacity and features than the BC796. I added a second BCD996XT to the stack for use as a data radio for PRO96COM and other purposes. While not shown in the photos yet, it is mounted with the RH-96 in the cargo tray forward of the cupholders. |
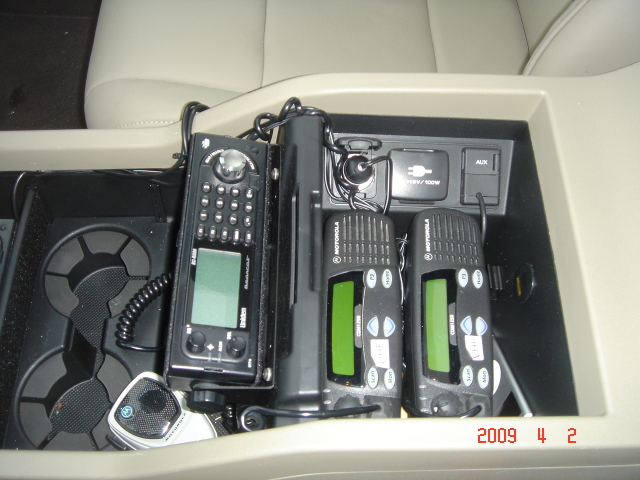
| Other Radios: |
For work and GMRS purposes I have a pair of Motorola CDM1250’s, 1 VHF and the other UHF, both with remote head kits installed. These are very capable 64 channel radios that allow me to receive and send MDC ID’s and legally operate on my UHF and VHF work channels as well as GMRS (UHF) and 2 Meter ham channels (VHF). Rounding out the radio selection is a Kenwood TM-D700A, a 2M/440 dual bander that is standard with a remote head. This radio has wide-band receive and allows me to use it for a variety of monitoring when not used for ham purposes. I use a Stridsberg 4 port wide-band multicoupler for the scanners, this allows me to use only(!) 4 antennas for my radios. In addition I have an older Garmin GPS-III that I constructed a custom cable for that allows me to connect to 3 scanners and the dual bander (for APRS). |
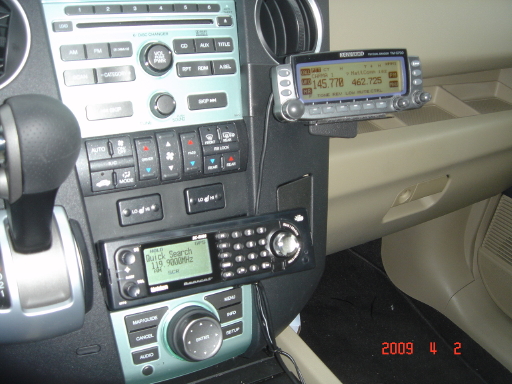
| New Vehicle Considerations: |
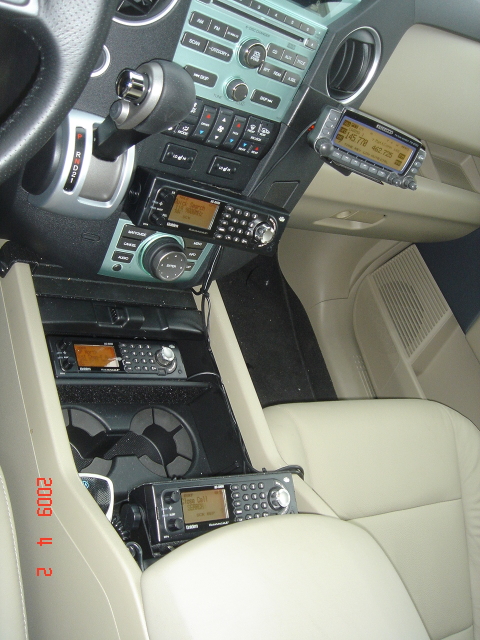
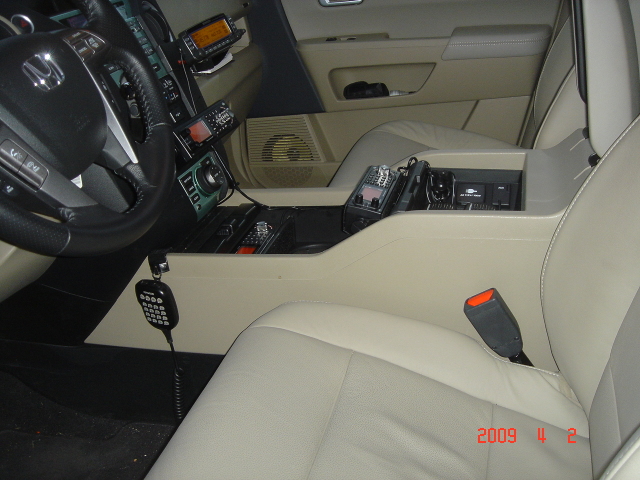
The wife had a couple rules for this project going in. First, there were to be no visible holes inside the car. The second was that there would be no impediment of the passenger side seat. The third was that there would be little or no visible wiring. The last was that the drink holders would remain unobstructed. She had no problems with drilling holes on the roof for antennas however. After I bought the new 2009 Honda Pilot I left the radio control heads in the car for a couple weeks to play around with various mounting location solutions. I finally decided on putting the Moto heads under the arm rest door, a hutch that also contains an AC outlet, an iPod connection and a cigar cord socket. It was just the right size for a stacked set of CDM heads mounted on a short piece of 2x4. This brings them to a perfect height within the console hutch. Since I don’t change the channels on these often they can reside under a lid. I then decided to mount the RH-96’s in 3 spots. One will be mounted with its regular bracket to the forward side of the hutch behind and clear of the drink holders. The second would be mounted somehow to a small cubby below the radio/AC controls and the third would go forward of the drink holders in the center console. I later added a fourth scanner there, originally a PRO2096 and now a BCD996XT. This is used mostly as a data radio for PRO96Com. This left the dual bander head. I came across a mention on RadioReference of a company called ProClip that makes custom clips to allow radios, cell phones etc. to be mounted on cars without drilling holes. They snap onto the dashboard’s trim pieces where they come together. I ordered the one for my Pilot and it arrived today. I will mount the Kenwood head to this. I then bought 5 3”x3” speakers at a hamfest. I chose these speakers due to their size and that they had a great sound after trying one out. These were mounted to a piece of aluminum stock and fit perfectly under the front passenger seat without getting in the way of the seat motors or other moving parts. I eventually replaced them with full sized Motorola speakers as the volume just wasn't enough otherwise. I had to then place these alongside the center console, while visible they are out of the way. The actual radios themselves will go into a storage compartment at the rear of the car. This compartment is under the floor and the deep part of the well is just right for the radios to be mounted. I cut a piece of ¾ inch plywood to fit, along with a slot to allow access to the spare tire and painted it flat black. I then put felt furniture runners on the bottom and sides to avoid scratching the plastic well as much as possible. Next I mounted 2 handles on the board to make it easier to pull it in and out of the well for work or security. Then I mounted the radios and accessories to the board, leaving room for a fuse block. All this was done in the garage, that is a lot easier than working in a cramped vehicle. Quick Connects will be used to allow easy removal of the board for service or security. I ran the bundle of wires along the passenger side floor and, after the installer installs the power leads, will encase the bundle in wire loom. There are control head cables for all 6 radios, speaker cables for all 5 speakers, an auxiliary antenna cable (that allows me to connect a handheld scanner to the multi-coupler), an extension for the Kenwood mic, and power cables for the rear radio tray. My installer, a company that builds police cars and fire engines etc., will be installing 5 NMO mounts on the roof of the car and running the power cables. Since the power cables will need to breach the firewall and the holes drilled in the roof I will have them done professionally. I don’t want to set off a side cushion airbag or drill thru an AC vent or something, if he does it then his insurance can fix it… |
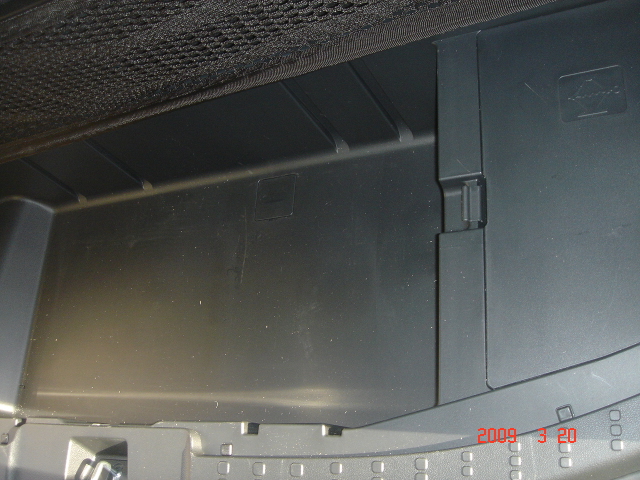
| This is the well where the radio tray will be mounted. I had to cut a slot in the board to retain access to the spare tire drop device, the little square thing in the lower tray. On the right side under the door is the tire jack kit. Just forward of the tray is the third row seats, a hole will be drilled for the cable bundle by the installer, probably just to the left of the jack kit compartment. | |
|---|---|
| To the left is the rack of radios dropped into the tray. Between the Kenwood on the upper left and the scanner & GPS in the middle is a 4 port multi-coupler for the scanners. Behind the CDM's will be mounted a fuseblock and a hole for the wire bundle. | 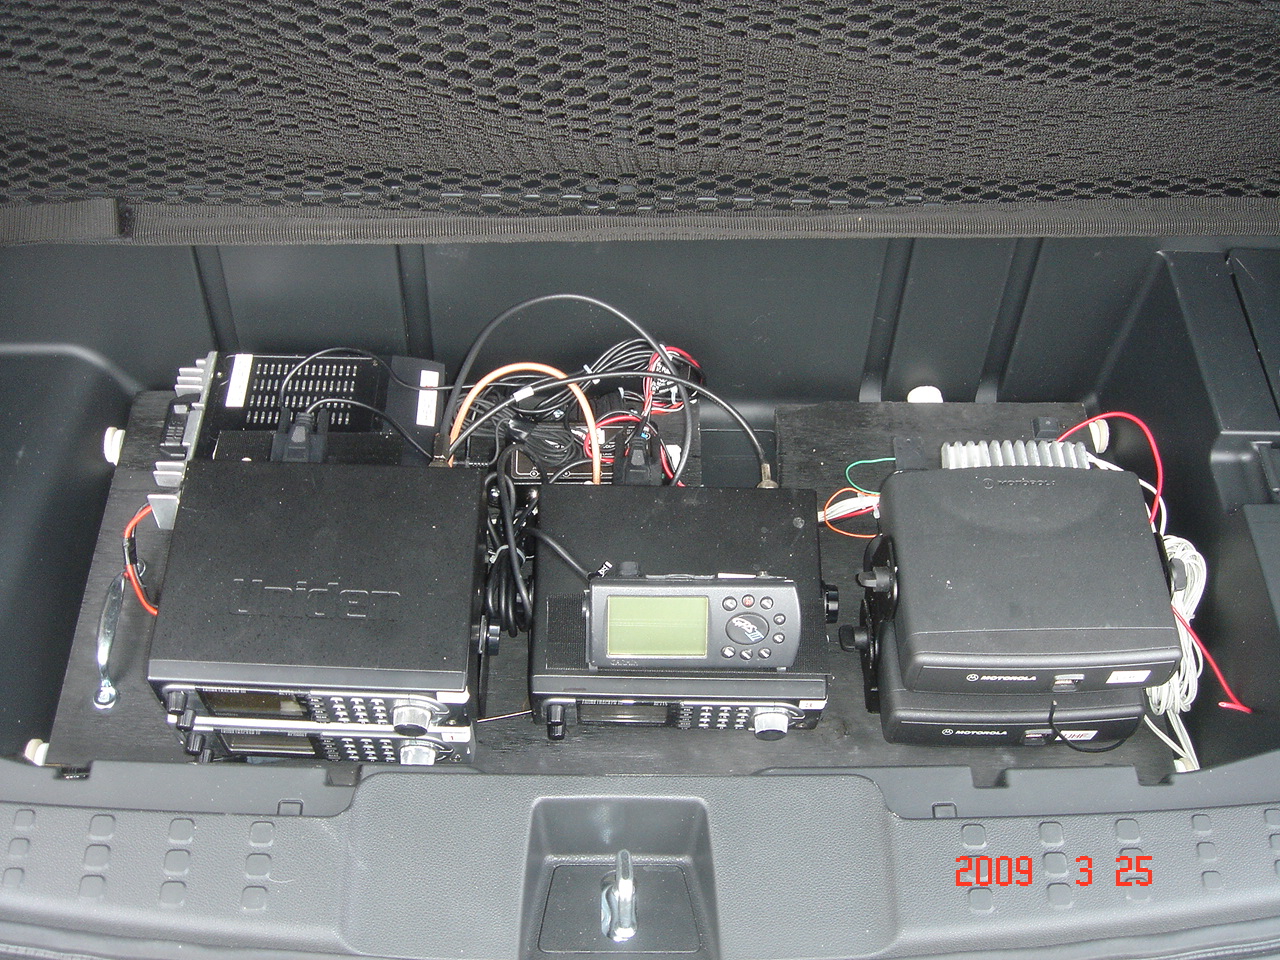 |
| Here is the rack under construction in the garage. The furniture bumpers keep the rack from sliding around in the plastic storage well, there are similar bumpers on the underside of the tray. The height of the radios is just right to put a little pressure on the cover and keep it from bouncing. Should this become an issue I will install threaded inserts in the floor of the well and bolt the rack down. | 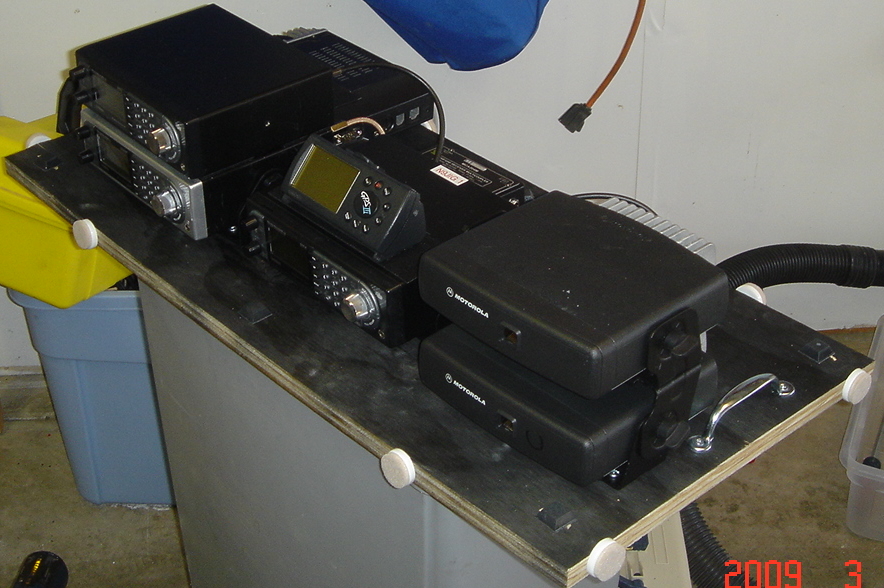 |
|---|
| After you close the cover the radios are completely hidden from view and sunshine. |  |
|---|
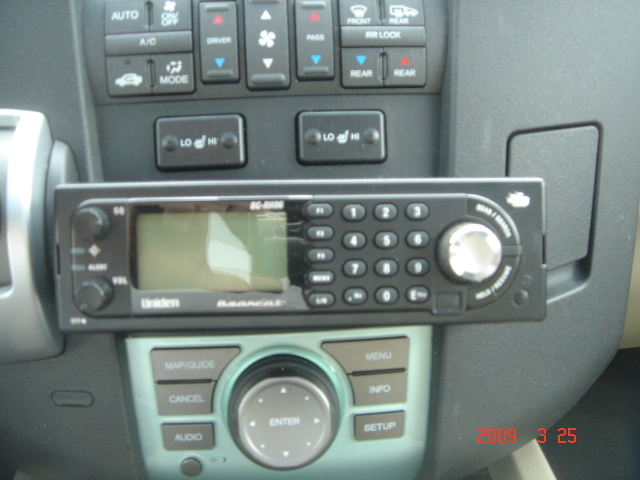
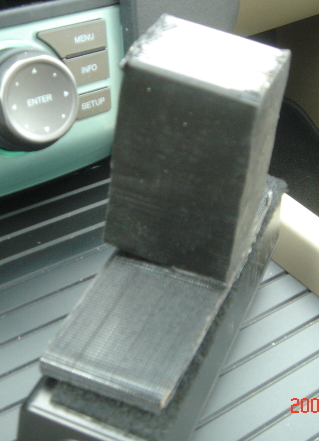
| One of the RH-96's mounts in the dashboard. The right picture has the shaped wood that fits into the well and holds the radio head up. A spacer between the two pieces angles the head up a tad to make for easier viewing. I since swapped the flat wooden part and used a piece of aluminum stock instead. The entire piece fits into the well now and is unseen when mounted. The RH-96 adheres to the mount assembly with heavy-duty Velcro. |
|---|
 |
 |
|---|